Reality as a Service (RaaS)
Reality as a Service (RaaS) is an open source platform for hosting physical OpenAI Gym environments. A few motivations for it are:
- it lowers the barrier to transitioning to real robots in both effort and cost,
- it allows the outsourcing of maintenance of robots to specialists,
- it amortizes the cost of robots over more researchers and RL practitioners,
- it results in less down-time for expensive robots, and
- it is neato
The robot is controlled via a custom gym environment found here. It is designed to be a simple drop-in replacement for the usual OpenAI gym, having the same API as the corresponding OpenAI gym environment.
Try out RaaS here! raas.perciplex.com.
Getting Started
Install Gym Environment
We use the same interface as OpenAI Gym with a custom environment. To install the simulated gym-raas environment first install the standard OpenAI gym:
pip3 install gym
Then install our custom OpenAI gym environment:
Via pip on PyPI
pip3 install gym-raas
Manual install
git clone https://github.com/perciplex/gym-raas
cd gym_raas
pip3 install -e .
Make a Controller
To start a new gym-raas controller, create a new project on Github or fork (it's a button in the right upper corner) our starter repository on GitHub. Either way, you must include run.py at the root directory of the repo which is the entrypoint invoked by our RaaS servers.
gym-raas implements an identical interface to the standard OpenAI gym. See their documentation for more information. The following implements a simple random controller
import gym
import gym_raas

env = gym.make('RaasPendulum-v0')
env.reset()

for _ in range(1000):
  env.render()
  env.step(env.action_space.sample()) # take a random action

env.close()
When run locally, the above code performs a Gym simulation with physical parameters set to match our hardware. When run at RaaS, the code controls an actual robot! The gym-raas environment automatically detects when hardware is available, so no code changes are necessary to transfer from simulation to hardware. In addition, it will add a 0.05 second delay between each call to env.step in order to maintain real-time control at a rate that matches the simulation.
You may be interested in some of our other example projects:
- https://github.com/perciplex/raas-example - An energy shaping swing-up controller
- https://github.com/perciplex/raas-rwg - A controller built by random guessing weights in a neural network
Submit Job
To submit, copy the url of your repo into our job submit page.
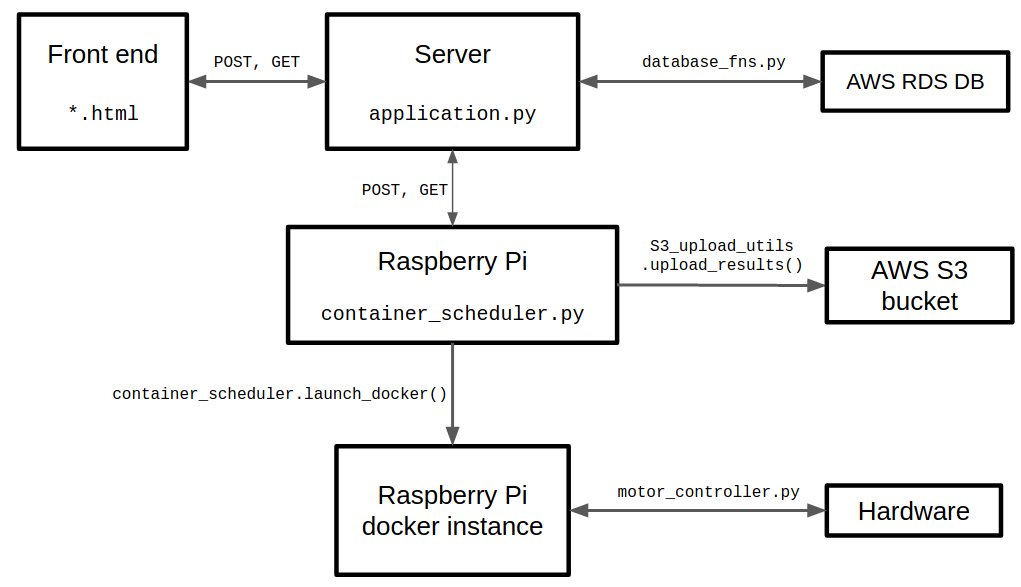
How It Works
The webpage is hosted on an AWS server which is constantly being pinged by a fleet of Raspberry Pis.
The server is responsible for taking POST requests for new jobs, maintaining a queue of jobs, and serving data from completed jobs. Its code may be found in the /server folder.
The Raspberry Pis have a python program running called container_scheduler.py. This program queries the server to pop jobs off the queue. It loads up an Ubuntu docker image which builds your project by cloning your Github repo and invoking python3 run.py with a timeout of 120 seconds. Upon job completion, the data of the job is sent to an S3 bucket.
The motor is controlled by a program called motor_controller.py which communicates with the docker container via ZeroMQ. It in turn uses the pigpiod daemon for low level control of the motor and sensing of the encoder.
Building Your Own Pendulum
The pendulum is built using easily available hardware. The following are instructions for purchase and assembly.
Bill of Materials:
- Raspberry Pi (We use a Pi 4)
- Power Supply for Pi
- SD card for Pi
- L298N Motor Driver Board.
- Ribbon cable
- Gearbox Motor with built in encoder. 12V 600 RPM
- 12V Power Supply
- Power supply female donkus plug. DC Power Jack Plug adapter
- Wire
- Paint Stirrer Rod. Only the best for us!
- Mounting 2x4
- 4mm Flange Shaft Coupling
- 25mm DC Gearbox Motor Bracket
- 4x m3 12mm nuts and bolts
- Mounting nuts
Here is an Amazon shopping cart link with the materials.
More information can be found in the hardware folder of the repo.